Follow the Meaning: Walkthrough + All Cats
Follow the Meaning is a point-and-click adventure game from Hiking Mind Studio. Step into the shoes of detective Paul Trilby, who is summoned by Dr. Susie to investigate an island town’s secret – a mysterious hospital, where citizens are admitted and return without their memories.

Guide detective Paul Trilby by clicking on specific points of interest on the screen. Explore and investigate as you interact with the environment. Hold the mouse and drag to move the map and explore your surroundings. To use an item, click on it and then click on your desired location in the environment. Turn on hints by clicking on the lightbulb icon on the top-right corner of the screen.
There quite a few logical and inventory-based puzzles, but overall, it’s a short game. Here’s the full walkthrough for Follow the Meaning:
Quick Access
Complete Walkthrough
Click on the mailbox to read the letter from Dr. Susie. She wants Paul to meet her at the hospital. Close the letter.

Open the lighthouse’s door. Take the pair of paddles. Use the paddles on the boat to travel to the next destination.

The Town
Pick up the bone. Move to the house with the chimney:

The house is guarded by a dog. Offer the dog a bone to distract it, then click on the door. You will be greeted with the first puzzle.

It’s a circular jigsaw puzzle. Rotate the three circles to align them and form the face of a person. The outermost circle must align with the upward-rising hair strands on the gray background. Solve the puzzle to unlock the door and take the axe.
Use the axe to chop down the tree, causing it to fall and form a bridge across the stream.

Cross the bridge. Talk to the kid playing in the park. He says he saw a doctor putting something on the mailbox.
Click on the mailbox to read the letter. It’s from Dr. Susie again. There’s a map showing the hospital’s location and the hideout of the “resistance”. Paul has to safely meet her at the hospital, by crossing the big wall. but for that he needs to work with the resistance – they have already sent someone to help him on his journey.

Take the signpost with the bulb symbol.

Pick the club ticket from the trash can.

The Club
Go to the club. Use the ticket to unlock the club door.
It seems the club has a dress code and only people with flat-top hats can enter. The bouncer won’t let you in, but there’s a trick to solve this hat puzzle. Putting the bulb symbol signpost on the ground and turning on the spotlight will cast a shadow of Paul’s bowler hat as a flat top hat on wall. After doing this, click on the bouncer and he will let you in.

Enter the club and approach the bartender. She offers you a free drink if you can help her organize 6 bottles. Look closely at the labels—there’s a purple blob on each one. Your task is to arrange the bottles so that the purple blobs align in the correct order. Click on the buttons below every bottle to organize them.
Solution for the bottle puzzle:

Get the drink from the bartender. Try to steal the coin from the table and the drunkard will stop you. Pour the drink into his jug. When he dozes off, pick the coin from the table.

Go back to the main room. Use the coin to unlock the door titled WC.

Take the screwdriver from the trash can. Use the screwdriver to open the vent above the commode.

Take the faucet’s knob from the unlocked vent.

Attach the knob on the broken faucet. Turn on the faucet and worms will come out of it. Collect the worms.

Outside, move to the pier and talk to the fisherman. He needs bait. Use the worms on him. Instead of using the worms as bait, he will ingest them and puke out an ID.

Take the ID from the pile of vomit.

Use the ID to unlock the door in the large wall, which may grant access to the hospital on the other side. Unfortunately, access is denied. Luckily a bespectacled gentleman, possibly from the “resistance” appears behind you. Initiate a conversation with him. He suggests finding a different route to reach the hospital and gives a black key.

Go back to the club. Take the stairs to a locked door. Use the black key to unlock the door. You are now on the terrace.

Click on the level attached to the wheel pull the rope and turn day into night.

A cutscene will be shown on the screen. It’s a scene at the hospital.
Go back to the main room of the club. Pay attention to the unlocked door with the crescent moon symbol above it. Enter to view a new room with a bar and a pub.

Pick the hat from the barstool and give it to the bald man. He will wear it and drop a metal box on the table.

To unlock the metal box refer the hint on the painting near the bartender. It’s the painting of a campfire. Click on the box to reveal a strange triangle with an inverted image of a fire on the top. Now refer the painting and look at the size of the smoke clouds above the fire. Replicate the the size of the smoke clouds by clicking on the triangular buttons to stretch the lines.
The solution to the campfire /metal box puzzle is here:

Solving the above puzzle will unlock the metal toolbox, revealing a spanner. Pick the spanner from the box.

Find the hint to the pattern near the submarine. There’s a signpost near the stairs by the submarine. Click on the signpost to reveal the hint for the lightbulb puzzle:

Use the spanner to repair the power box near the tall building.

A series of lightbulbs will appear on the right-hand side of the screen. Light up certain bulbs in a pattern to solve the lightbulb puzzle. Replicate the pattern by lighting only a select few bulbs:

When you get the pattern right, the sail of the submarine opens up. Click to enter the submarine. This is the alternate route that the bespectacled gentleman was suggesting.

The Submarine
Inside the submarine, there will be several doors. It’s like a maze. You must access the correct doors to reach the lowest floor of the submarine. Follow the random green blinking lights all over the submarine’s interiors as hints to enter the correct door so that you can reach the end without getting lost or see screenshot to get through the submarine maze:

Once you reach the lowest floor on the submarine, pick the vintage radio. Open the battery compartment and take battery.

The man working on something on the table gets up and checks the radio. Pick the key above the table.

Click on the the submarine’s black box. Click on the three-eyed man to zoom into his face. Open the small battery compartment attached to his forehead and put the battery onto the empty slot. The bulb on the compartment glows and focuses at a keyhole. Use the key on on it to open the black box.

Take the black oval shaped glass from the box. Put it on the porthole on the extreme right side of the submarine. Click on the porthole to exit. Watch the cutscene.

We are now in compartment #2 inside the submarine.
Flip the switch on the wall to turn on the lights of a small chamber.

Enter the chamber and you will see a man wearing a hat sleeping. Click to take off the hat and pick the eye-shaped button from his scalp.

Take note of both three-eyed men—the one sleeping and the one depicted in the artwork on the wall. Observe their facial features carefully. The sleeping man has all three eyes closed and a scar on his head, while the one in the drawing has curly hair and an open third eye.
Go back to the chamber and attach the eye-shaped button on the strange machine in the middle. Three tubes are protruding out of the machine. When you fix the eye on the machine’s slot, three faces will emerge out of the three tubes. Again pay attention to their hairstyle and the eyes.
You now have a total of five three-eyed people with unique hairstyles – two in the chamber and three protruding from the tubes.
Click on the locked porthole on the extreme right hand side of the submarine. You will see five drawings of three-eyed people – only the hair and eyes.
Match the hairstyles and eyes in the drawings with those on the faces in the chamber and the three tubes. The faces in the chamber and tubes have a mix of open and closed eyes. Click on the eyes in the porthole drawings to replicate the open or closed state of the eyes on all five faces with unique hairstyles. Here’s the solution:

1. The face with hair standing on the end has all 3 eyes closed.
2. The face with v-shaped hair has the middle and right eye open.
3. Face with parted hair has the middle and right eye open.
4. Face with scar on the forehead has all 3 eyes closed.
5. Face on the paper with curly hair has the middle eye open.
With the help of the above solution, replicate the open and closed state of eyes on the porthole drawings to unlock the porthole. Enter the porthole to exit. Watch the cutscene.
The Winding Hallway (Tunnel)
You find yourself in a dimly lit area with winding hallways. Click on the entrance to step inside.
Speak with the old man waiting there—he knows a recipe of a potion that can banish the witch. But he needs the old bottle hidden at the end of one of the hallways.

Exit the potion maker’s room and move to the end of the hallway with a tiny hole. Click on the hole to take the empty bottle.

Go back to the potion maker’s room and click on the painting to enlarge it. You will find the old man in the painting. He is holding a piece of paper, click on the paper to know the recipe.
Click on the cauldron to start making the potion. With the help of the potion recipe on paper, press these symbols in the same order as shown in the screenshot below to mix liquids:

When ready, use the empty glass on the cauldron to fill it with the green colored potion.
Exit the room and use the potion on the evil witch to gain access to two branching hallways.

Click on the door in the bottom hallway and solve the puzzle using a trial-and-error approach to find the correct two-symbol combination needed to unlock the door in the top hallway. Here’s the solution:

After solving the door puzzle, move to the top hallway and exit the dimly lit area.
The Hospital Premises – The Other Side of the Wall
You are now on the other side of the wall, near the hospital. Meet the three-eyed man sitting on a wooden path on a small pond. He scrambles the wooden path, turning it into a jigsaw puzzle of sorts. Place the right wooden block onto the blank spots to complete the puzzle.

After solving the puzzle, cross the path to go across the pond and pick up the pink candy.

Talk to the masked man under the makeshift shelter. He reveals a hint – “candies are enchanted by the witch, and they can turn people into trees.”

Talk to the woman sitting under the tree. She asks whether your ID is hanging from the tree’s branches. She can help you get it if you bring her back a black mushroom.
Click on the three houses with chimneys to begin solving a series of fire puzzles. Your task is to create a fiery path by clicking on empty squares on a grid, filling all the empty spaces with glowing red orbs.
It may sound simple, but this is one of the toughest challenges in Follow the Meaning. Here’s how to solve the fire puzzles: just trace the paths drawn in the screenshots to complete them.
#1

#2

#3

Each time you solve a single house’s fire puzzle, smoke will rise from its chimney. Complete all three puzzles to make smoke rise from all three houses. The smoke will then merge into a dark cloud that floats over a tree. Rain will fall, and a black mushroom will sprout on the ground.

Pick the black mushroom and give it to the women under the tree. She gives you the ID.
Talk to the man standing near the guard wearing a blue uniform. Use the pink candy on him. He turns into a tree. Paul gets sucked into the void on the tree.

Paul is teleported to another dimension. There are three puzzles to solve. The first two are easy, but the hat puzzle is the toughest and can be solved on a trial and error basis.
#1 Cactus Plant Puzzle Solution: Click to fill the dots on the sun, matching their positions with the glowing dots on the cactus. Only select the dots on the sun that align with the glowing ones on the cactus:

#2 Symbol Puzzle: Click to select only the symbols on the sun that correspond to the animated symbols on the ground:

#3 Hat Puzzle: One of the most challenging puzzles in Follow the Meaning. Select and put only those hats that look similar to the middle hat. Here’s the solution:

Solving all three puzzles will force Paul to return back to Earth.
Talk to the guard and give him the ID. He won’t accept. Create a makeshift catapult by clicking on the elastic tied to the first tree. Then, use the catapult to launch Paul over the guard. You won’t be successful in doing that. There must be some other way.
Move near the wall and use the ID on the ID scanner to go back to the town.

Talk to the onlookers and the kid. Two people seem to have apprehended an old lady. As you talk to the people, you will see a familiar face. The same bespectacled gentleman. Talk to him. He has a way to launch Paul over the guard.

Follow him to the gate. Move near the catapult and use it. This time, the gentleman helps Paul by launching him over the guard.

Enter the old woman’s house and pick the phone card from the table.


Don’t forget to open the book kept near the window. There’s a picture of a man with hypnotic eyes and 6 unique squiggly lines are scribbled on top of his head. Make a mental note of this picture as it will be useful to solve a puzzle.

Use the phone card on the phone booth. Dial 0623 to call the ambulance. The same numbers can be seen scribbled on the ambulance.

Dialing the numbers will display seven cards on the screen. One card, the largest, has a blank face, while the other six feature different types of eyes:
- Select the hypnotic eyes from the card.
- In the next set of cards, select the last card – Squiggly lines as hairstyle

Do these seem familiar to you? Well, you saw the same on the book in the old woman’s house.
After selecting the correct eyes and hair style, the ambulance leaves the hospital premises, leaving the gates open for you. Click on the building behind the ambulance. Watch the cutscene.
The Computer Room
Inside the building, there are two rooms. A computer room and room with a table. There’s Dr. Susie’s locker on the right hand side in the room with the table. You will need an access card to unlock it. Here’s how to get the access card:

In the same room with a table, click to open the tall metal locker. There are a bunch of keys in the top compartment. Four keys of various sizes and the symbols on each key is hint to unlock the door on the left – it gives access to the computer room.
Click on the locked door on the left-hand side, which features a unique door access system. Four symbols are arranged vertically, with buttons below each symbol that allow you to change them. On the left side of the access system, four keys of varying sizes are attached, arranged from shortest at the top to longest at the bottom.
Use the sizes of these keys and the symbols on each key inside the metal locker as clues. Match the symbols on the access system with the ones on the keys in the locker, adjusting them accordingly. Here’s the solution to the door puzzle to access the computer room:

As soon as the door unlocks, access the computer room. Click on the computer to turn it on. As the screen loads, Paul dozes off and gets abducted by aliens.
The UFO Puzzle
Inside the UFO, click on each alien from left to right to collect three items,
Alien #1 – Remote control from its stomach

Alien #2 – A green bulb from its eye

Alien #3 – An antenna

Click on the strange machine of the left-hand side. Install the bulb, remote control and antenna on the machine:

Paul is released from the UFO and he wakes up on the computer table, only to see the screen loading at 100%. An access card gets printed. Use the card to open Dr. Susie’s locker. Take the disk and read the top secret document.

Leave the building and head toward the bunker. Click on the bunker to reveal a new puzzle.
Place the disk in the center of the puzzle to activate specific glowing lines. These lines connect to secondary symbols such as =, I etc. with four major symbols located beside the glowing lines. You’ll also see these four major symbols on the left side of the screen. Trace the line beside each major symbol to identify the corresponding secondary symbol. Now choose the same secondary symbol beneath its respective major symbol on the left side of the screen.
Solution to the disk puzzle:

The bunker unlocks after solving the disk puzzle. Enter the bunker. Click on all items to find little hints to solve the main whiteboard puzzle.
Drag and drop the following pictures to the empty frames (dotted lines ) to complete the whiteboard puzzle and unlock the tunnel:

Enter the tunnel entrance.
Paul is in a strange room. Click on the laptop to find three screen lock patterns to open the door. Replicate the same pattern lock puzzle to unlock the door. Since this a typical pattern lock puzzle, how you draw the pattern on the access system plays a crucial role to unlock the door. Here’s how to solve it:

The Hospital
Now comes the most difficult puzzle in Follow the Meaning – the second maze, inside the hospital. The first one was in the submarine. It was much easier as the hints were blinking lights.

But in this maze, all you have is a map pasted on the door. Click on the following doors to find your way to Dr. Susie’s room:
- Open the Door on the right-hand side. This is where the map was pasted.
- You are now in a room with a round table. Open the Door on the left-hand side.
- You are now in a room with only two doors. Open the Top Door.
- This is the room with three chairs. Open the Left-hand Side Door.
- Room with three doors. Click Right-Hand Side Door.
- You are now in the CC Camera room. Open the top door.
- It’s a room with three doors. Click on the top door to open.
- You are now in a room with square tiles (Also see the map). Open the top door.
- It’s a room with a panel on the right and only one door. Click on the panel and peel the sticker to earn an achievement. You will find a logo of the game developer. Open the top door.
- You are now in a room with two doors. One on the top and the other on the left-hand side. Open the top door.
- You are now in a room with three doors and a bed beside the left-hand side door. Click on the door on the right-hand side to open it.
- It’s a room with only doors. Click the top door.
- A room with 3 doors. Click on the right-hand side door to open it.
- You are now in a dark room (On the map it has the symbol of a bulb with an X mark. Click on the top door.
- A room with only two doors. Click on the door on the left-hand side.
- Another room with two doors. Click on the top door.
- A third room with two doors. Click on the top door.
You are now in the interiors of the hospital. Click on the fourth door.

A lady on a stretcher asks for Paul’s help.
Move to the fifth room. Click on the pull cord to pull the blinds of the window.
To unlock the first drawer, replicate the same pattern seen on the windows blind on the locker. All you need to do is click on certain squares in a grid to unlock the drawer – the right squares to click are shown on the windows blinds.

Take the blue key from the drawer and use it on the machine beside the old lady to free her from the hospital.

Endings
Follow the Meaning has two endings.
When Paul tries to help the old lady escape, two doctors apprehend him and take him to Dr. Susie’s labratory.
The Doctors show him old CC camera recordings, revealing that paul has visited teh hospital multiple times and every time he tried to free the lady, he was caught. Paul does not remember all this.
Dr. Susie leads Paul to the main experiment room and locks the door behind them, ensuring the two other doctors cannot enter.
She says she does not have much time and wants to activate the transfer.
Dr. Susie takes off Paul’s hat, revealing to players that he is one of the three-eyed men. She begins the “transfer”.
The two directors of the hospital try to enter the room, but cant do it as the door is locked.
Ending #1: In the Clouds
In the last scene, a few dialog boxes are displayed on the screen. Follow the prompts:
System Warning – “A new file transfer.exe has been detected and will be added to your game folder”
– Choose “Continue” and double click on transfer.exe
The computer will start the transfer installation. Wait for the progress bar to complete.
Wait for the system warning dialog box: “Transfer.exe has been installed. All game files will be transferred to the cloud”
Click “Continue”
Every character from the game will be transferred from the folder to the cloud.
As the directors gain access to the experiment room, they are shocked. It’s too late. The transfer is complete and now all characters are literally in the clouds.

Ending #2: A New Beginning
As soon as the computer begins installing transfer.exe, click the cancel button. This will cause an exclamation mark to appear on the transfer.exe application, indicating that it is corrupted.

Double click on transfer.exe again. The dialog box reads – Warning – running might corrupt your game files. Choose “Delete Program”.

Dr. Susie asks if Paul wants to go through this again and only the transfer could save them.
Choose “Yes” when you see the next prompt – Are you sure you want to delete transfer.exe.
The directors says that they will cure Paul and soon everything will begin to feel like a dream he won’t be able to remember. One of them press the remote button, making him fall asleep.

Paul wakes up on the same bench and begins his journey once more, starting from where he left off. You will be back in the same island wheere it all began. It’s a neverending story.
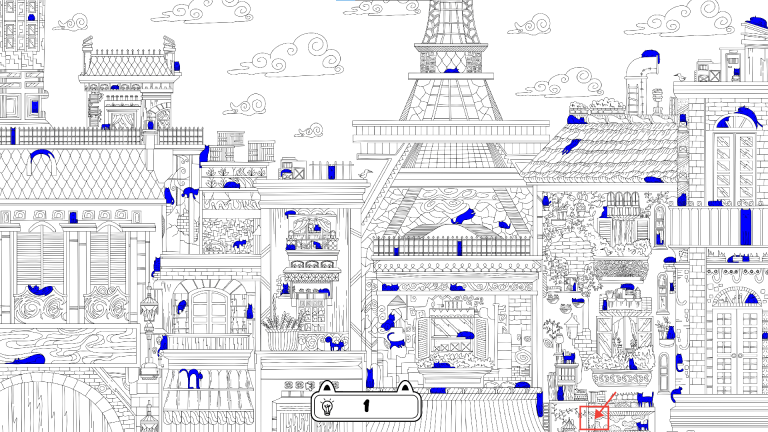
All Cat Locations
Follow the Meaning features a delightful mini game that cozy gamers will love. Your task is to find 8 hidden cats scattered throughout the game. These furry friends are cleverly tucked away in various scenes. To kick off your kitty-finding adventure, visit the cat lady in this building and start looking for cats.
Here are all cat locations in the game:
#1: On the roof of a building:

#2: Under the street light, near the pier. You will find her only when you have transformed day into night:

#3: Inside the club, once you have unlocked the door that has a crescent moon symbol on top. Access this entrance and you will see a cat grooving in the dance floor:

#4: When Paul enters the second chamber of the submarine, pay close attention to the water. You’ll spot a cat scuba diving in the background.

#5: In the dark hallway. While speaking with the old man to prepare the potion, click on the mouse beneath the table. A cat will appear, peeking from the edge of the room:

#6: The orange cat is hiding in a tree, near the three houses with chimneys:

#7: After picking the phone card from the old woman’s house to use the phone booth, you will see a black cat near the pond:

#8: When Paul is in the UFO, click on all asteroids to find a cute astrokitty hidden behind one of them: